Thursday, April 29, 2010

More fun with molten sugar

Today I took the day off because I was exhausted. Too much stress. I napped a while, drank some coffee, lazed around, and then... the kitchen started calling me. So I threw some butter, sugar, water and salt into a kettle and put the heat under it.  Soon the mixture started to bubble and foam up. I moderated the flame, clipped a candy thermometer into the pot, and posted myself there, pizza slice in one hand and silicone spatula in the other, stirring and munching. Sugar work requires patience. For me to be patient with pot stirring, I need distraction.
 The solution started out quite blond, but as the water cooked out and the temperature started to rise, it assumed a nice golden color. Still, it took quite a bit of time. I got through at least three games of solitaire on my phone, plus one slice of pizza and one lager before the boiling candy got up to 298 F. I took the pan off the stove, stirred in some vanilla, and threw the batch onto a couple of silicone sheets. A great thing about toffee is that it's so full of butter it doesn't stick to a darn thing. But I love the silicone mats so I used them out of habit. I left the toffee to cool and started chopping some almonds I'd toasted earlier. There's something meditative about hand-chopping nuts, so I seldom use a food processor. If I ever go commercial, of course I'll have to revise this approach, but for now I use my trusty chef knife and enjoy the rhythmic work. Then cleaned up the work space.
Years ago, when I first started working with chocolate at home, I'd get chocolate all over everything and leave cleanup for when I was done. These days, I keep a very clean, very organized work space. Chocolate goes where I mean for it to; if it strays, I immediately clean it up. I work more efficiently this way, and cleanup at the very end is much reduced.
Once the toffee was cool, I dusted it with cocoa to matte the oily surface, then tempered some chocolate and spread that over the surface. A generous layer of chopped almonds followed this, and a dusting of sea salt. Once the chocolate had set, I flipped the slab and coated the other side in the same manner, then set both slabs aside on a large cutting board and cleaned up the silicone mats and the chocolate-processing equipment. Then I broke the slabs up and sampled the finished product. Taste was exactly what I'd hoped for. Nice balance of sweet and salty. Texture was good, but could be improved. It was a tad shardy, when it should have been crumbly. Next time I'll add a little baking soda to the batch. Not enough to make it a brittle, but just enough to make the batch a little more tender.   
Now the toffee is portioned into two batches -- one for me to take to work, and one for my husband to take to his. Our coworkers are the main recipients of all my work. It's how we keep from gaining major pounds from my chocolatiering obsession.


Saturday, April 24, 2010

Three Days With Guittard Guest Chef Andrew Shotts

We made more than 20 different kinds of bonbons and confections during the three days of E. Guittard's "Artisan Chocolates and Confections" course, taught by chef Andrew Shotts. One of the most important things I learned was something that wasn't on the formal curriculum: how to align artisan chocolate making with the making of money. This is so valuable to someone like me, who right now has no way to make an income from chocolate work, but who will want to in the future. Now is the time for me to take a business approach to my chocolatiering: I need to calculate the cost of making each piece of candy I create, the cost of each piece of packaging I use, and think about how I would price the finished and packaged products if I were a shop owner or wholesaler. Later, when I set up a business, this way of thinking will be natural to me.

The space we worked in was everything a small-time chocolatier could want - The Chocolate Studio, run by Donald Wressell, who I think is executive chef for Guittard. He hosts the Guest Chef series there in Culver City, and the kitchen is set up for baking as well with a multilevel commercial oven, a proof box, a convection oven, and a bunch of other baking equipment. Chocolate equipment abounds as well: there's a temperer-enrober, a few Chocovision machines, a bunch of MoldArt melters, an industrial four-burner stove, an induction burner (want! want!), dozens of molds, and much more. There's a walk-in chiller, a huge freezer (essential. I suffer from lack of freezer space), and more counter and slab space than I have ever experienced. There's an upstairs office area as well. I'm still writhing with envy over that space. The days consisted of both lesson time and work time. We broke into three teams of four people and each had several recipes to set up in mise en place for the chef. Then, by turn, he went through each recipe, demonstrating how to successfully complete each step and ways to achieve efficiencies in the work. Day 1 was all about making slabs of ganache. Day 2 was pates de fruits, rochers, and marshmallows. Day 3 was popcorn confections, enrobing,  decorating and packaging. On each of those days, chef Wressell cooked while we worked, and served us the most delicious gourmet lunches.

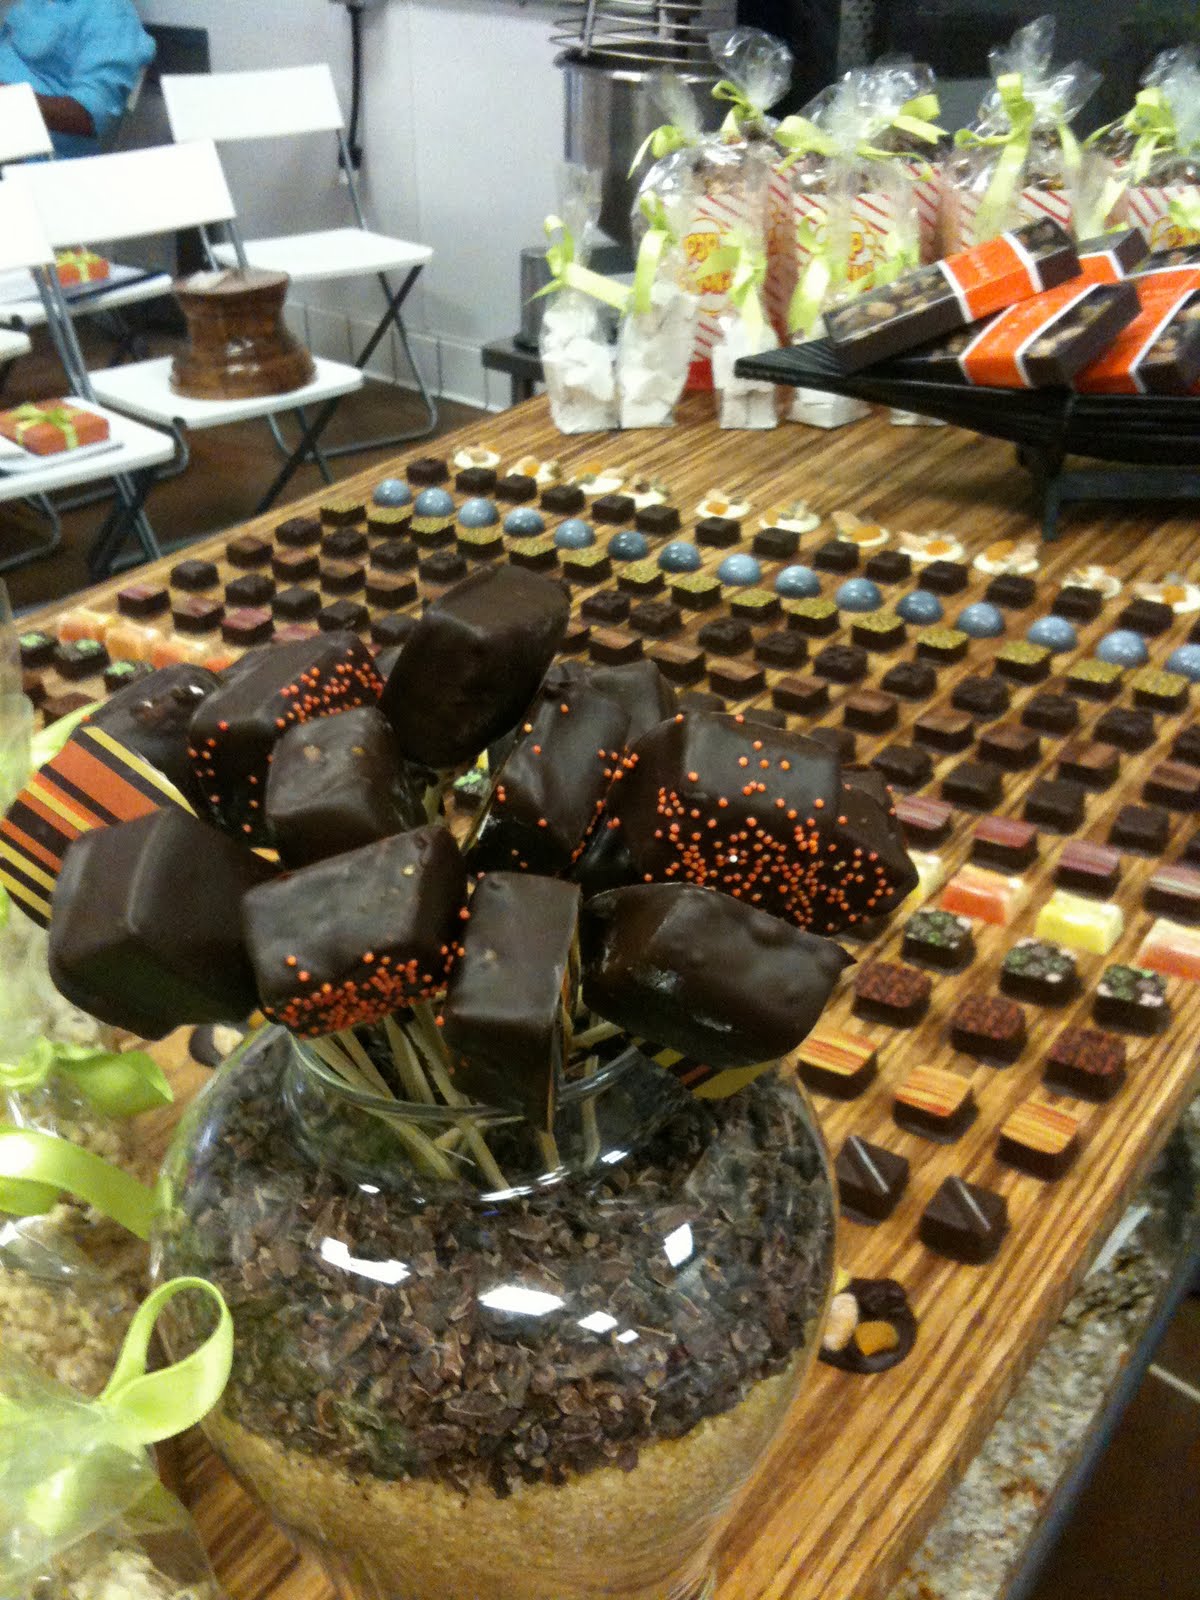
A major advantage of this class over the online one I took was the chance to meet other chocolatiers from all over the country and even the world. We had two participants who came from Mexico, two from Washington State, one from Utah, and the rest were from California. Some were hobbyists, some hope to open their own operations very soon, others have had new or longstanding family businesses. It was wonderful to hear their perspectives, learn from their experiences, and make new friends. Another wonderful thing was the chance to work once again with industrial chocolate making equipment. Even small-sized enrobing equipment makes a huge difference in the amount of product a person can turn out in comparison to hand-dipping each individual piece. In the photo above at left, the a 40-piece rank of enrobed centers have come down the enrobing belt and have just been covered with a transfer sheet patterned with colored cocoa butter. Chef Shotts smooths the sheet down over the wet chocolate that covers the bonbons. The chocolates will be transferred to a countertop to cool, and later the sheet will be removed and will leave the edible design behind. I also drooled over all the guitar cutter, which in a trice cuts a slab of ganache into 120 uniform pieces. It's a huge labor saver, and makes bonbons look a lot cleaner and more professionally made. I could go on for hours about this class, but I think what I'll do instead is post a bunch of photos and let you browse at your leisure. My summation is that I couldn't recommend any more highly the Guest Chef series from E. Guittard.

Friday, April 23, 2010

A big switch

I'm sold on Guittard chocolate now, so it's time to make a big change in my chocolate work. Having received a sample of every couverture Guittard makes, I am in the process of deciding which to incorporate into my recipes. I've used Peter's exclusively for the last 20 years, and recently made a switch to Callebaut for semisweet. I liked the depth and complexity of the Callebaut over the highly vanilla, almost marshmallowy taste of the Peter's (which I kept for use in some of my ganaches). But after using Guittard for three days I'm a convert. Now it's just a matter of selecting the chocolates I'll shell-mold with, which I'll enrobe with, and the ones I'll use in my recipes, and then going out and getting a few boxes of each. I have to start thinking about what I'll be making everyone for Christmas. I haven't forgotten to post about my class. It's just that I took more than 200 photos and need to sort through them and figure out which ones to share with you here. Look for an update this weekend.

Wednesday, April 14, 2010

Packed and ready to go

I haven't posted in a while because I've been too busy working to make candy. Feh! Not good. But tomorrow afternoon I fly to L.A. for three full days of chocolate classes. My chef coats are packed, along with my favorite candymaking shoes, Dansko clogs. Good for long hours on my feet working with my favorite medium. I'll report back on what I learned and how it inspires me.

Tuesday, April 6, 2010

Chocolate Class in L.A.!!

Two weekends from now I'll be attending a class called "Artisan Chocolates and Confections," which Andrew Garrison Shotts will be teaching for E. Guittard. See details. I'm so excited. Not only is it a 3-day, hands-on class, but it'll be located just blocks from where I used to live in Culver City. I loved that neighborhood; it was the best thing about living in L.A. The class will run from 9 a.m. to 3 p.m. Friday through Sunday, and Guittard is hosting a dinner on one of the nights. I can't wait to be there learning new things about working with my favorite medium, chocolate.

Sunday, March 28, 2010

Your Basic Peanut Brittle

With things getting increasingly depressing in my day-to-day (work) life, I needed a little hobby action to take the edge off the fact that tomorrow is Monday. So I ventured into sugar work. I had some choices: Hard candy? Taffy? Brittle? Toffee? I had a bunch of nuts in the pantry, so decided to make peanut brittle for the first time. The recipe was pretty basic: mix sugar, water and glucose syrup in a pan and boil the heck out of it. At soft ball, add peanuts and continue cooking, stirring constantly, until the mixture is a nice golden-brown color (at around 320 degrees F), then add salt, butter, vanilla, and baking soda. Watch the hot bubbly action! Pour onto an oiled surface, allow to cool, and stretch thin. Remember to use clean gardening gloves or two forks, because this stuff remains hot for a while.
Learnings: If you pour the brittle onto a marble slab, get to stretchin' right away. The slab cools down the mass very quickly (relatively speaking), and if you don't stretch it almost immediately after pouring, it'll set up and you won't be able to work with it. Also, I finally learned that with sugar work, the long boring part is waiting for the water to cook out of the solution. Once that happens, the mercury goes north very quickly and boredom is no longer a concern. Lastly: mise en place MUST include a bowl of ice water in case molten sugar solution splashes onto vulnerable skin.

Thursday, March 18, 2010

Coming Attractions

I've finished the Professional Chocolatier course I took through Ecole Chocolat, and now I have to keep up the momentum by refining my recipes and learning others. Only problem is that I also have to prepare for a job interview on Monday and do my best to get more interviews into the pipeline. Searching for work sure puts a crimp in my candy making time. I do wish I had a bunch of spare money lying around so I could open a little shop. Le sigh. Anyway, after my Monday interview it'll be time to dive back into the sugar bag and come up with a new challenge: Seafoam. I do not have the natural affinity for sugar work that I do for chocolate making. It will likely take all my self-discipline to avoid cursing from frustration and teaching my parrots dirty words. But I'll keep at the seafoam challenge until I come out victorious. Then it's on to brickles and taffies and toffees. Some of which I'll have to cover in chocolate, of course. I'll keep you posted.

Sunday, March 14, 2010

Nibby mint meltaways

The final piece for my last course assignment had to either be a cream-free truffle or a meltaway. I love meltaways and had never made them, so settled on those. The formula for a meltaway is 2 parts chocolate and one part coconut oil, plus an oil-based flavoring if desired.
Inclusions generally aren't used in meltaways, as they can distract from the silky-smooth melty sensation. But I decided to use cocoa nibs in a mint meltaway base. I enrobed them in a dark milk chocolate and topped them with some cocoa nibs I made myself by chopping up some whole cocoa beans with my trusty chef knife. I had some prepackaged Scharffen Berger nibs, but they had gotten heated up in shipping and the cocoa butter had risen out, settled on the surface and then hardened up again, giving the nibs with an unsightly bloom. These cocoa beans, which are raw and dried rather than roasted, have a deep cocoa flavor with a bright, acidic overtone. Plus, they're gorgeous and without bloom. They cracked apart easily with hardly any pressure from the knife.

I started my meltaway batch by chopping 12 ounces of milk chocolate. Then I measured out 4 ounces of coconut oil and melted it. Next I melted the chocolate to 120 degrees F, let the coconut oil cool to 120 degrees, combined them and added an eighth of a teaspoon of mint oil. Then I added the prepackaged nibs (I did it old-school, judging by sight and feel the correct ratio of nibs to meltaway base). I mixed it all thoroughly, then turned it out onto my slab. Chocolate mixed with coconut oil is extremely fluid. I could barely keep this batch from running off the slab, and I had to table it very quickly and deftly to temper the mass so it would set up properly. Once I got the mass in temper, I scraped it off the slab and into a bowl, then poured it into a frame set up on a silicone mat on my other slab. I cleaned everything up and started another batch of passionfruit caramels, and after an hour had gone by I checked the meltaway to see if it was setting. No dice. After another hour had passed without sign of much crystallization, I picked up the whole setup, slab frame and all, and took it downstairs. Our basement is wine-cellar cool -- an ideal spot for candy setting and storage. Soon the batch had set up nice and firm. It was easy to cut, and then I got to practice my dipping technique. I feel much more comfortable now with my pieces. I'm able to set them onto parchment, move them slightly forward to prevent a foot from forming, then swipe the fork out without leaving behind the dreaded vampire-fang points of chocolate to mar the smooth base. I needed to pause every few pieces to drop a few nibs onto each before the chocolate set up. The big bonus for today is that there was very little humidity, which meant my chocolate was very easy to work with, not sludgy at all. It's been a wonderful chocolatiering weekend.

Sunday, March 7, 2010

Fondant, Continued

The loss of my lemon fondants irked me, so tonight after dinner out with some friends, I whisked the rest of the basic fondant batch into the microwave, heated it to 160 F, added a tablespoon of blood orange concentrate, a teaspoon of grand marnier, and a half teaspoon of grated orange peel. Stirred well, spooned it onto waxed paper atop my slabs, and let it set up. Tomorrow they'll get a coating of bittersweet. These are miles better than the lemon basil attempt from earlier today. I'm still not a fondant convert. The super-saturated sweetness of fondant takes the purest of flavors and Disneys them up. Orange is no longer tangy, it's Tang (tm). Not that there's anything wrong with Tang, or Disney for that part, says the blogger who doesn't want to be sued. But it's not a flavor I'm looking for in my candies. Still, I'm counting these as a win because they are pretty, and they are tasty.

Lemon and Sweet Basil Fondant

I finally made a (nearly) successful fondant. I don't have much luck, generally, with sugar work, and so my fondant assignment has been a challenge. Last night I made up the first batch and it got a few degrees to warm. Result: Hot Glue Hell. The batch was so sticky I couldn't work it. So I threw it out and started again. I was up until 12:30 a.m. working the fondant on my slab to get it crystallized enough. Then I let it sit overnight, mixed it with lemon juice, lemon zest, and a little fresh sweet basil. I added several drops of lemon essential oil, stirred and tasted. It was really nice! Very lemony with just a little zing of basil. Then I decided to try balancing the sweet lemony taste with a drop of sweet basil essential oil. The feeder in the bottle top was too generous and before I knew it my one drop turned into three, overbalancing the batch toward the herbal notes. I decided to go ahead and make up the molds, to see if the taste combination with chocolate would save the batch, but no luck. I made the most beautiful chocolates of my life, but threw them away after they'd had their photo opp. I will keep the recipe, sans the basil essential oil.

Tuesday, March 2, 2010

Gianduja with handmade placed decorations

Gianduja is tricky business for gianduja beginners. It lures you in with "I'm so easy" and then makes you work for it. Work for it I did, and after some struggle I met with success: cashew giandjua (a combination of cashew butter and milk chocolate) covered in perfectly tempered semisweet chocolate (it looks a bit matte here but that's just the lighting. Honest.) and topped with little moon-shaped handmade white chocolate placements.

I started with 350 grams of milk chocolate and 200 grams or so of cashew butter, melted both and mixed them together, then dunked a teaspoon and did a taste test. Nicely balanced nut and butter flavors and textures. Also: Yummy. So I poured the mass onto my slab and moved it around with my spatulas until it started thickening up a bit. Then I did a quick test. It didn't set up. Pooh. So I increased the chocolate by a 150 grams and tempered it on the slab, which took forever because of the fat from the cashew butter. By that time was ready for dinner so I said "screw it," threw the tempered mass into the rulers on the slab and let it set. A couple of hours later I came back to a slab that was so sturdy I could have built a little house on top of it. It was nothing you'd want to cover in semisweet and bite into. I muttered curses, covered the thing up with plastic wrap, and left it overnight to sleep by itself and think about what it had done wrong.

The next morning I melted it down with 100 grams more cashew butter, tempered it again on the slab, put it back into the rulers, and let it set while I worked. The result: Perfectly smooth gianduja that was also firm enough to cut, enrobe, and then top with my little moons and discs (see previous post). The third out of five efforts for my final assignment can now be marked as satisfied. Additional note: I topped a finished gianduja with some cinnamon and tried it out. Tasty! I'll add this variation to my next recipe.

Embellishments

For part of my assignment, I have to finish a chocolate with a "placed decoration" of my choice. So I decided to make discs using a rubber stencil, a transfer sheet, and white chocolate. I'm no big fan of white chocolate, particularly in candy centers. But it's good for dramatic enrobing of dark centers, and  it can be used to make decorations, so I keep it around. The trick is to get the best quality stuff you can afford; the cheap stuff is ghastly. I gathered my ingredients (white chocolate, cocoa butter) and supplies (bowls, spatulas, transfer sheet, rubber stencil, jelly roll pan, bench scrapers, parchment, and both marble slabs), put my hair back under my wacky chocolatiering hat, washed my hands, and set to work.

For this exercise, I decided I'd better thin out the couverture a bit. White chocolate can be vexingly thick and difficult to work with. So I fished out a few ounces of cocoa butter and nuked away until it was liquid. Then I melted the white chocolate and mixed in the heated cocoa butter until the chocolate was the consistency I wanted. I set the cocoa butter aside to be re-tempered and stored, and then I tempered the white chocolate on my slab.

While the chocolate was melting, I placed the transfer sheet, design side up, onto my marble. On top of that I placed my circle stencil mat. Then I poured the tempered chocolate over this set-up, spread it evenly, tapped out the bubbles, and waited for it to set up enough to scrape down. Learning the proper timing on this takes practice, as evidenced by the fact that I didn't do it quite right this first time. I scraped, and some of the chocolate came away from the circles I was trying to create. I'm not sure if this is because I hadn't let the couverture set up enough, or because I let it set up too much. I'll need to investigate. At any rate, I peeled off the stencil and after the chocolate had set, I saw that many of the little discs came out well enough to use for my assignment. Some were raggedy-edged, and I cut them down into sickle moons. If I want to do this on purpose next time, I'll remember to use my circle cutter when the chocolate hasn't fully set. Otherwise, it cracks and you lose most of your hard work.

Notes for next time: Thin the white chocolate more; figure out the correct timing for scraping down the stencil.

Sunday, February 28, 2010

Neglectful me.

I broke a promise a couple of posts ago: I did not post the results of my butter ganache experiment. The reason I didn't do this is because the experiment tanked. Why I tried making a white chocolate ganache I can't tell you. I hate white chocolate and so does Bob. But all my chocolate-making reading got me fired up and I was convinced I could make an intense, fruity, zingy butter ganache out of white chocolate. I ended up garbage-disposalling a good pound and a half of white-peach and sweet basil butter ganache, which made my sink smell all fruity and delicious. I was black-hearted and mean-spirited over this development for a good half a day. Then I decided to try the same flavor idea but with a sugar system (fondant) as the base rather than a fat system (ganache). So I tried making peach-basil fondant using reduced peach puree infused with fresh basil. I got something that tasted very sweet but not so peachy. More candy down the garbage disposal. More mopey fuming. I'm now officially determined to create a peach-and-basil-centered chocolate of an intensity that will make people weep with gustatory joy. You watch me. I'll post about it when it happens.

Saturday, February 27, 2010

Assignment 2 of 5: Shell-molded ganache

Today I tackled Piece 2 out of the 5 included in my final assignment. I decided to make a ganache and pipe it into a chocolate-lined polycarbonate mold. One of the requirements of my assignment is to use the shell-molding technique, and to decorate the bonbon using at least two colors of chocolate or cocoa butter. I started my recipe design by thinking about the ganache. Bob requested something with coffee, and I adore coffee brewed with cardamom so I landed on that flavor combination for my filling.

I started by heating up some heavy cream and stirring in coffee beans and split cardamom pods. I let that steep for about an hour and a half. While that was happening, I chopped milk chocolate (Peter's) for the ganache and semisweet chocolate (Callabaut) for the shell. Once the cream had infused long enough, I put it through a strainer and added enough whole milk to get it back up to the correct volume. I added a little glucose to inhibit excessive crystallization of the finished ganache, then heated the mixture to boiling, and poured it over the chopped milk chocolate, mixed until everything was nice and smooth, and poured it out into a hotel pan to cool. Next I lined up my decorative supplies: colored cocoa butter (green, black), lustre dust (mahogany), paint brushes. I chose the colors of the cocoa butter and lustre dust because I was hoping for a stone-like appearance for my chocolates. Not that stone has anything to do with coffee or with cardamom, but I'm supposed to be honing my coloring skills so what the hell. I heated up the cocoa butter colors in their squeeze containers, using small heat bursts in the microwave. Once it was just heated enough to be liquid I shook it well. Then I squirted some of the black onto a paper towel, seeing how narrow a line I could make. Argh. The line was more like a series of blobs. I tried again and got a very thick line. Not what I was looking for. I thought "Hm. If I squeeze firmly and move quickly, this might work," so I tried drawing a thin black line down the center of each depression in the mold. Gah! The result was far less than elegant. But it would have to do because I didn't have time to experiment with the air brush system I bought a couple of days ago.
Next I dipped the edge of a stiff brush into the green cocoa butter and flicked it against my nail to spatter droplets into the mold cavities. Fetching. Finally, I picked up the lustre dust with a smaller brush and blew it into each depression so it landed in a fine, sparkly mist. The cocoa butter dried quickly as I tempered the semisweet chocolate. I ladled the chocolate into the mold, careful not to fill it too much, then rattled it on the counter vigorously to remove air bubbles. Next I quickly inverted the mold and let the chocolate pour back out into the tempering bowl. It's a pretty fluid chocolate so it poured out easily. Once the shell had set up, I piped the cooled ganache in, banged the mold on the counter again to get out the air bubbles (good thing these molds are made of thick polycarbonate!) and set the whole shebang aside so the ganche could set up a bit. A mistake: Not scraping the top of the mold enough. See the dried chocolate between the depressions? It ended up haunting me later. With chocolate set aside for the moment, Bob and I teamed up to make fresh fettuccine (Bob's first attempt!) and my late mother's Bolognese sauce, something I'd been craving. This gave us an excuse to open a lovely pinot, which I sipped (Julia Child style) while I finished my chocolate making.
With the piped ganache set sufficiently, I used my marble slab to re-temper the semisweet chocolate and ladled that over the mold, filling over each square of ganache and then tapping (again) to remove air bubbles. It's not that I have a compulsion about this: It's that air is the enemy of shelf life on the inside of molded chocolates, and on the outside it makes unsightly holes in the surface of the candy. Check out the finished product at left -- all that banging away paid off. Anyway, after scraping down the mold I let it sit for 15 minutes to crystallize the chocolate, then stashed it in the refrigerator for another 20 minutes. This contracts the chocolate and makes it easy to unmold. I turned the candies out onto the cutting board, and here is where my untidy mold cleaning, which I mentioned above, told its tale: My chocolates all had skirts on them. Most of them easily chipped off and left clean edges, but it was a far cry from the neat turnouts the pros routinely get. I'm giving these bonbons a B for the following reasons: The chocolate tempered well and came out with a shine, and the ganache is  flavorful and beautifully textured. However, it's a tad runny for comfortable eating, and the decoration of the chocolate is not compelling. Execution of the shell mold was too sloppy, and I could have left the pieces for a little while longer for a smoother turnout. Not a terrible result for an afternoon's effort. And my official taste tester keeps making off with these. He's quite a food critic, so if these candies weren't tasty I wouldn't have to be sneaking aside the ones I promised to mail to a couple of people...

Wednesday, February 24, 2010

Caramel: Sweet, sticky success.

I've been wrestling with caramel recipes lately, throwing out one batch (that one hurt; the raspberry puree wasn't cheap) before studying up and coming out with an acceptable offering. My passionfruit caramel was quickly munched up by my husband, his colleagues, and my work buddies as well. The key to caramels: lack of humidity and abundant patience. This batch was a standard soft-caramel recipe using sweetened condensed milk. I like this type because it reminds me of being a kid. But I decided to zing it up a bit, so when the cooking temperature reached 240 F, I added 250 grams of passionfruit concentrate. Note for next time: Heat the concentrate to boiling so it won't slack back the batch quite so much. Caramels take a lot of stirring to prevent scorching the pan, and a lot of doctoring so the stirring won't crystallize the mass. I doctored with corn syrup (standard, not high-fructose). Next time I'll go with straight glucose, which is the supercharged variety of good ol' Karo, and see how things go. Anyway, once the caramel set up I had the devils time cutting it. I need to find a trick for that. But the enrobing went easily and I used cocoa-butter transfer sheets to put on the design. Next up: shell-molded fondants, perhaps cherry cordials.

Sunday, January 31, 2010

Two ganaches are better than one.

I'm studying the formula for butter ganache, a less-popular ganache than the cream variety. I suspect the reason butter ganaches aren't made as often in current American chocolatiering circles is that more care is needed in its preparation. The formula is easy: 2 parts chocolate to 1 part liquefier (butter plus any liquid flavoring). Sweeteners are not considered liquefiers, which is something I need to remember, as it's counterintuitive: For butter ganaches, only liquid sweeteners may be used. I'm tinkering with the idea of using fruit powders along with concentrated fruit purees in my butter ganaches, which leads me to wondering if I should make my own purees or buy them. I'll probably buy them for consistency's sake. I realize this is chocolate-geek noodling at its worst. I'll make the next post a bit more exciting by showing the results of my butter ganache experiments.

Sunday, January 17, 2010

Things that make you go "ick"...

There are some things that chocolate should never be paired with, and chief among them is bacon. Bacon is the darling of the foodie world right now. Artisan bacon made from locally raised, free-range, heritage-breed pigs. Bakers have jumped on the bandwagon with bacon-topped maple bars, bacon-bit-dusted cupcakes, and more. Inevitably, the chocolate world followed suit. Ignoring the maxim that just because you can do something doesn't mean you should, one world-known chocolate maker has put out a bittersweet-bacon bar, and at least two respectable chocolatiers I know of have developed a recipe for bacon ganache. Bacon ganache. It's enough to make me reach for my smelling salts.

Monday, January 11, 2010

School's in.


I'm learning to temper chocolate all over again, after more than 20 years of streak-free candy making hobbyist bliss. I'll step back a bit: Just after New Year's Day, I decided to sign up for an online course in professional chocolatiering, offered through Ecole Chocolat. At first thought, "online" and "chocolatiering course" do not seem to fit well together. Yet, they do. I've been conducting assigned research, reading lectures, completing exercises, and finding resources (equipment, packaging, ingredients, supplies) that it would have taken me forever to locate on my own. And, I'm getting my hands into chocolate a lot. I first learn to temper chocolate in the 1980s when I worked at The Chocolate Gallery in Santa Barbara. The owners taught me to temper chocolate using the seed method: You melt the chocolate to a certain temperature to destroy all crystal formations. Then you cool it while agitating and slowly introducing solid ("seed") chocolate. This reintroduces a stable, crystalline structure, so once you've shaped the chocolate or draped it over a delicious filling, it will set up firm, shiny, and with a distinctive snap when it's bitten into.


I've known all along that the purist's way of tempering is without using seed chocolate, but simply melting the chocolate, pouring it onto a marble slab to cool, and working it with a spatula until it becomes stable enough to crystallize. That's what I practiced tonight, with various degrees of success. The first time, I managed to overheat the chocolate after the initial cool-down period. That destroyed the stable crystal formations and the result was spotty chocolate with no snap. Boo. But the second time I got it just right. Then, according to the assignment, I was supposed to scrape the correctly tempered chocolate onto a piece of parchment to let it set. But I couldn't help myself -- I had two pounds of perfectly tempered semisweet chocolate sitting in front of me, so I stuffed a dozen or so dates with marzipan, then dipped them  and set them on some parchment to firm up. They were tasty. But the presentation needs work. They look like something a small animal left behind.